11/30/2012

Design For Assembly


DFA
As with all parts of design, the design for assembly (DFA) must not be overlooked.  It’s not just clips, screws and adhesive.  Clips have to be very well thought out, screws must fit into bosses/holes and fail-safing must be used to stop components being assembled in an incorrect way.  Of course there is automated assemble, where the control is in the code, setup and mechanisms.  However when working with humans the control you have is in the design of the components and product.


Poka-Yoke
To prevent human error within product assemble a fail safe method must be used. For example if you needed to clip a cable with a connector into another part, to ensure that the connector is plugged in the way, an extra feature or rib could be used so that the two parts can only be clipped together in one way.  This term of fail-safing is not just used in the manufacturing and assembly Industry but also so we the users put our SIM cards for our phones in the correct way.  So we can plug our USB devices in only one way.  Or even draw runners that stop you from pulling the draw all the way out.  This method of fail-safing is called Poka-yoke.  A Japanese term first coined by Toyota’s manufacturing system. 


Clips, screws, adhesives and fasteners
As a basic rule, the less components, generally, but not always, the less time it takes to assemble.  The more components that make a product, the more parts to attach together. With plastic parts clipping and screwing them together is often used. 

Screws
  • Are an extra component and cost.
  • Take time to be put in.
  • Must be the correct screw to use and put in correctly.  (Not at an angle, and to the correct torque).
  • Easy to disassemble.

Clips
  • Molded into component most often.
  • Quality of the clip is controlled mostly be the designer and molding process.
  • Not always easy to disassemble and can sometimes snap off.

The decision of whether to use screw or clips is a difficult one.  From the view of production clips means less components, most likely less time to assemble and less equipment needed.  Although it may be more difficult to rescue parts if a product is faulty/damaged and needs to disassembled to reuse the good parts.  Sometimes the use of both can be a good combination.

Assembly
A designer can tell how difficult an assembly process is by looking at the faces of assembly workers when they are assembling a product.  If they look as if they are struggling, there is your difficult part of the assembly process.  If there are multiple workers assembling the product look at which process is the bottleneck, which workers are standing around waiting for the others and who is constantly working to build for the next process.  By watching your assembly workers you can see the flaws in the design.  If you don’t have access to watching your assembly workers then you can try to assemble the product yourself.  Whether it is with real molded parts or 3D printed parts you will be able to get an idea of the difficult parts and processes.  Doing this can also make you think how you will assemble the product  and how you will want to break up the processes in jobs if multiple people are assembling the product.


Hopefully this gives you a brief overview of DFA with a bias on plastic components.

Coming soon will be a series on Injection molding tooling design!

11/09/2012

Design Considerations - Injection Molding Is Tricky, Part 3

It's all in the Tool
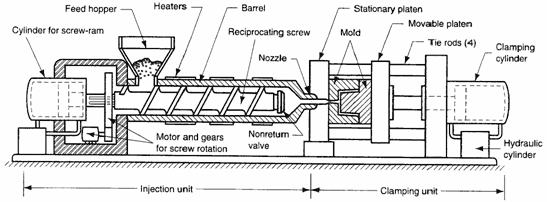
To understand the design considerations for injection molded parts, really you need to know about injection molding tools and machines.  At school we are shown an incredibly basic line drawing of an injection molding machine.  This image shows what the average non-design punter needs to know.  However a designer/engineer needs to to know, what the machine looks like (so you can spot one and not look like a fool), what consideration are needed when designing a part for one and therefore what an injection molding tool (the mold) looks like on the inside and how it works.  Combine this and the basic knowledge that hot plastic is pushed into a mold and cools to the shape and you can design the part to be able to be made.


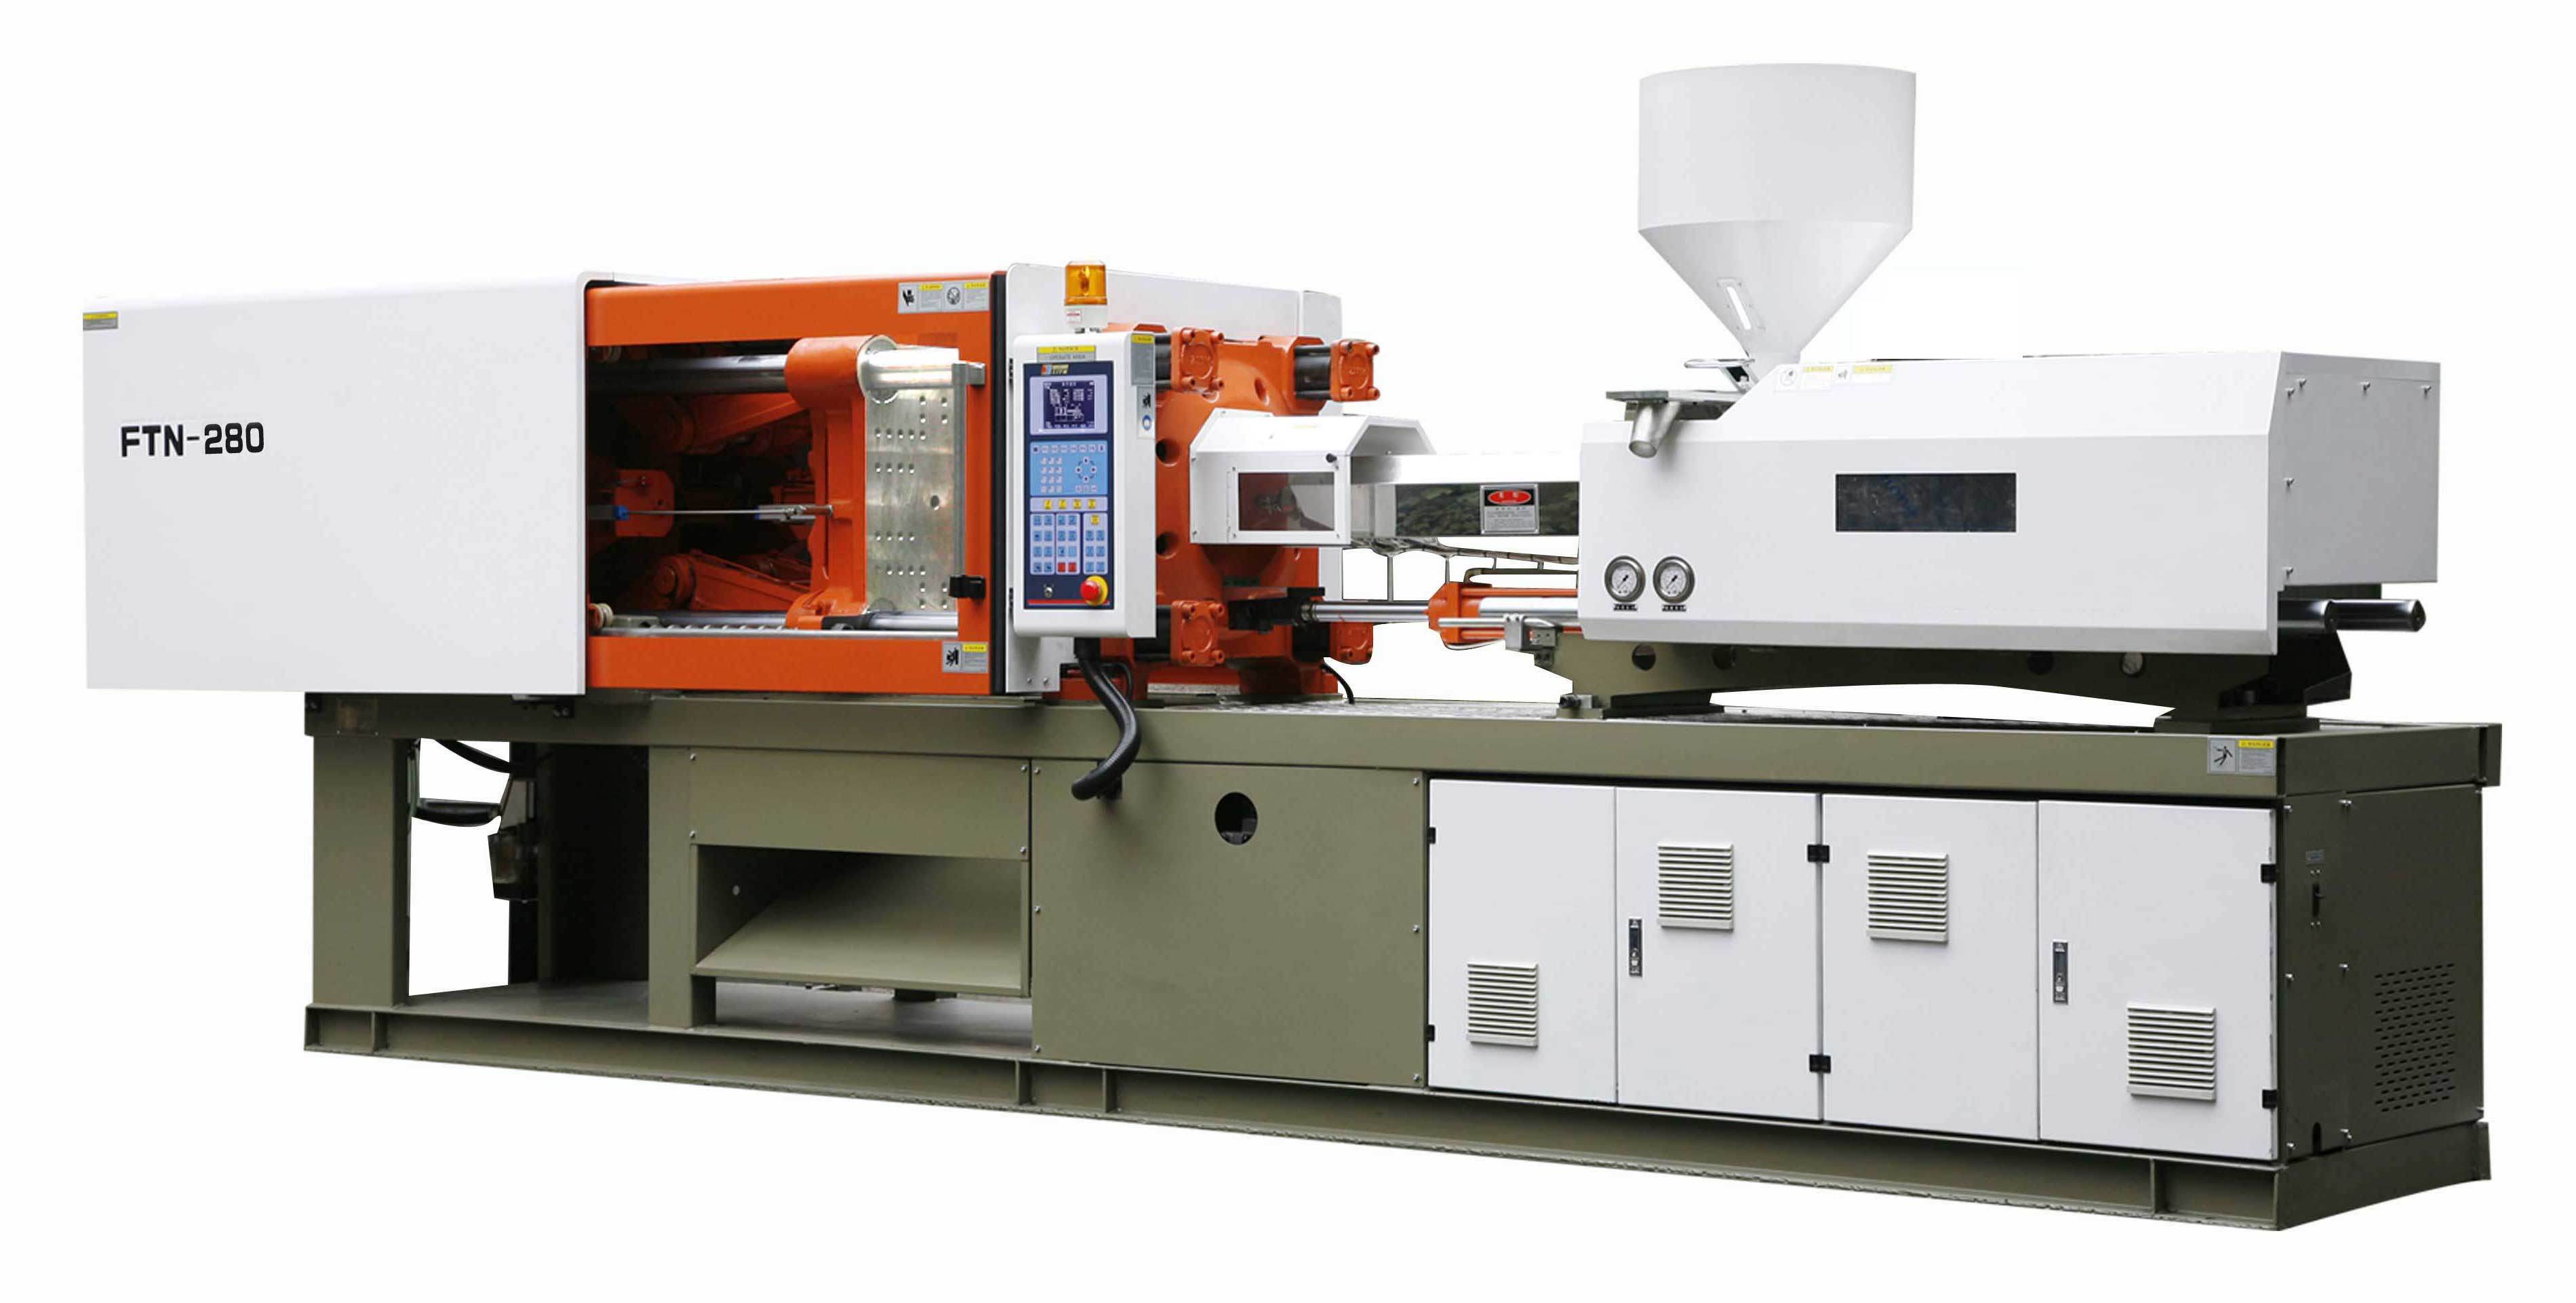
Real life injection molding machine
So to know what an injection molding tool looks like, below are some images of injection molding machines.


To clarify, the mold is called a tool.  These tools can be big or small and simple (simple open, shut design) or very complex, depending on the design of the part.  This however is in the hands of the designer.  The more simple the tool, the cheaper it is.  Therefore knowing how to design a part that can be made in a simple tool is very valuable.


The insides
Above shows the insides (both core and cavity respectively) of a simple tool.  With this tool the part is completely drafted and there are no undercuts on the part.  When you add undercuts or areas that cannot be drafted then extra parts must be added to the the tool.  These are called movements.  There are different type of movements, which will be covered more in depth in a later series focusing on specifically on tools, but these movements add to the tools cost.  The more movements you have, the more expensive.  The tool below has two movements called sliders.  The green rods, on the left hand mold go into the holes on the light pink and green blocks on the right hand mold.  As the tool closes the blocks are forced to move into position by the angle of the rods, then when the tool opens the blocks slide back out of the way so the part can be ejected. (The grey rods are so that the tool aligns correctly).


So how to have less movements you need the part to have draft angles.  Draft angles are needed so the part can come out of the mold when ejected.  If you cannot have draft angles on the part (as little as 0.5 degrees can be fine) then you have to have sections that move away to let the part be ejected after it has been molded.  Hence being called a movement. 

Undercuts also make getting the part off the mold difficult/impossible in most materials.  In some, that give some flex you can use the bump-off technique (shown below) but otherwise you have to have sections in the mold that again move away once the part has been molded to allow the part to be ejected.


This is the last part in the Injection Molding Is Tricky series.  There will be more on injection molding tools in a later series coming very soon.

10/13/2012

Honey I shrank the Molding, Injection Molding is tricky Part 2


Shrinkage
Shrinkage is an unescapable truth in plastic injection molding that engineers are faced with.  With shrinkage comes warpage and therefore once again twisted parts.  Shrinkage is determined by the part shape, thinkness and the fibre direction, which in itself is determined by the flow direction of the injection molding plastic.

Plastic structure types
There are two different plastic molecule types that affect how uniform the shrinkage of the part will be.  These are Amorphous and Semi-crystalline structures.  The table below shows a list of which plastics have which structures.  With Amorphous structures we can expect to have uniform shrinkage of the part.  This does not mean that it ill just be a scaled down part of what you have designed, as you must consider the shape of the part too.  If it is longer one way than the other it will shrink more where it is longer and less where it is not.  But the shrinkage will still be uniform.  Plastics with a semi-crystalline structure have non uniform shrinkage, this makes these especially difficult to estimate the shrinkage with.  This is why you need a computer aided analysis package, such as Moldflow to help predict the distortion.

Amorphous
Semi-crystalline
Polyamideimide (PAI)
Polyetheretherketone (PEEK)
Polyethersulphone (PES)
Polytetrafluoroethylene (PTFE)
Polyetherimide (PEI)
Polyamide 6,6 (PA 6,6)
Polyarylate
Polyamide 11 (PA 11)
Polysulphone (PSU)
Polyphenylene sulphide (PPS)
Polyamide (amorphous)
Polyethylene terephthalate (PET)
Polymethylmethacrylate (PMMA)
Polyoxymethylene (POM)
Polyvinylchloride (PVC)
Polypropylene (PP)
Acrylonitrile butadiene styrene (ABS)
High Density Polyethylene (HDPE)
Polystyrene (PS)
Low Density Polyethylene (LDPE)
Acrylonitrile Styrene Acrylate (ASA)
Polybutylene terephthalate  (PBT)
Polycarbonate (PC)
Glass filled plastics (GF)


 http://en.wikipedia.org/w/index.php?title=File:Polymerketten_-_amorph_und_kristallinEN.svg&page=1

In Practice
Moldflow software is used to predict the distortion (deflection), volume metric shrinkage, fibre orientation and cooling.  Moldflow can then work out from the volume metric shrinkage if the shrinkage is uniform or not.  Moldflow does most of the hard work and thus allows for the shrinkage to be compensated for by the “packing stage”.  The packing stage of injection molding is where pressure is applied to the plastic to compress and force more material into the mold.  5 to 25 percent more material is used to add more material in the packing stage.  The injection molding gate is frozen during the packing stage to prevent material escaping the mold.  Also a bigger cavity in the mold (tool) will also compensate for shrinkage of the part.

As discussed in part 1, thicker wall sections take longer to cool and therefore can sometimes be more difficult to fill as the thinner section will have already cooled.  To combat this a rib can be used to help get material to these problem areas by promoting the material flow in a direction, this is called a Flow Leader.  Flow leaders are also used to help with weld lines, which will covered in a another part of the series.  The opposite can be done to restrict the flow direction by having less material in an area.  This is called a Flow Restrictor.

As mentioned in the intro, fibre direction is determined by the flow direction.  This is controlled by the placement of the gate, the point at which the material enters the mold at.  This is very important when you have many features in your part, such as holes or loops that the plastic must go around as these affect the flow direction, making the shrinkage and warpage non uniform.

http://www.feaanalysisservices.co.uk/images/moldflow-img.jpg

Real World
As with everything in the real world you have to compromise and nothing is really perfect.  Manufacturing is governed by cost and capacity, which heavily effects cycle time of injection molding machines.  To cut cycle times down you can use Conformal cooling and help with distortion.  This however can effect aesthetics of the part, and to what extent is hard to predict even with the help of Moldflow.  Conformal cooling also adds extra cost, although because of the costs saved my quicker cycle times, some of those costs can be got back.  For more on Conformal Cooling click here

Summary
  • Design parts with even wall thicknesses.
  • Design where possible uniform parts.
  • Use Flow leaders and restrictors where necessary.
  • Moldflow will tell you any issues with your part, however it is a good idea to know what to look for and think about when designing parts for manufacture.

Don't get it twisted, Injection molding is tricky Part 1


Don't get it twisted!
Injection molding is tricky, there are many things to consider in the design stage as well as the fact it is such a complex process where many aspects can affect the part and it is hard to get it perfect first time.  If you are new to injection molding you might want to brush up on some of the very basics of injection molding here.

Thick bits
Different thickness sections of a part will cool at different speeds.  A thinner section, such as a rib will cool quicker than a large thicker surface.  So a rib cooling quicker can twist or bend the section of the part that is yet to be fully solid.  This obviously creates issues, as you want a part that is the same as the CAD and therefore needs to be analyzed before the manufacture stage to see if you could have issues with the design with a software package such as Moldflow from Autodesk (which is free for students).


In Practice
A lot of the time you don't want to sacrifice the designed-in ribs and thin sections as they are normally therefore a reason.  Therefore a part will be overcrowned.  By running Moldflow analysis it is possible to predict how much the part will bend in the injection molding process.  With this information you can then reverse the bending so ideally when the part does bend, it bends into the correct position that you want.

In a perfect world you would just want a constant thickness part.  To achieve this practically you need to core out sections.  Cored out sections reduce the thickness of features.  Coring out is explained as well other techniques on Protomold's website.  Where you can also get quotes for injection molding for prototypes (which is good for students to estimate costing for course work!) 

For help with ribs and bosses, Protomold give a way a free Cube.